Monitoring Azure Service Fabric Microservices with Azure Monitor

By their very nature distributed platforms, applications and services running in the cloud are comprised of many moving parts. In this post we’ll see just how simple it is to add powerful & unified monitoring to your Azure Service Fabric clusters by integrating with the Azure Monitor service (formerly known as Azure Log Analytics). We’ll also touch upon a few Azure Service Fabric / Azure Monitor best practices from the field.

To start off, Azure Monitor provides a single, cost effective & integrated experience for monitoring Azure resources and hybrid environments. It helps with maximizing operational availability, performance & resource utilization of your VMs and containers by collecting, analyzing and acting on both platform and application level telemetry.

Data collected by Azure Monitor fits into two groups, metrics and logs:

Metrics: are numerical values that describe some aspect of a system at a particular point in time. They are lightweight and capable of supporting near real-time scenarios.

Logs: contain different kinds of data organized into records with different sets of properties for each type. Telemetry such as events and traces are stored as logs in addition to performance data so that it can all be combined for analysis.

Log Analytics agent

For advanced Azure Service Fabric monitoring scenarios we’ll forgo the usual recommendation of using the Azure Diagnostics extension (commonly referred to as the Windows Azure Diagnostic (WAD) or Linux Azure Diagnostic (LAD) extension) and instead opt to leverage the more flexible Log Analytics agent. I like to think of the Log Analytics agent as just another microservice which runs on all Service Fabric nodes but first we need to make it part of the Virtual Machine Scale Set (VMSS).

The Log Analytics agent was developed for comprehensive management across on-premises physical and virtual machines, containers and VMs hosted in other clouds. The Windows and Linux agents connect to a Log Analytics workspace in Azure Monitor to collect both monitoring solution-based data as well as custom data sources that you configure.

Adding the Log Analytics agent to the Virtual Machine Scale Set (VMSS)

I’ve assumed you have an Azure Monitor Log Analytics workspace already set-up, but if you don’t then head over to Create a Log Analytics workspace in the Azure portal.

The easiest way to add the Log Analytics agent to the underlying Service Fabric Virtual Machine Scale Set (VMSS) is to use the Cloud Shell or Azure CLI. The following official documentation from the Azure Service Fabric team does a great job of explaining the process step by step: Add the agent extension via Azure CLI.

Note that the Log Analytics agent can also be added directly to an Azure Service Fabric cluster Resource Manager template in case of standing-up new clusters, thus configured with Azure Monitor integration from the get-go.

For bonus points, if you prefer PowerShell and having tested it, a great community contribution from Nilay Parikh performs the task just as well: Add-OMSAgentVmssExtension:

.\Add-OMSAgentVmssExtension.ps1 -ResourceGroupLocation "location" -ResourceGroupName "yourresourcegroup" -WorkspaceName "omsworkspacename" -VMScaleSetName "scalesetname" -AutoUpgradeMinorVersion

Following the above steps, the Log Analytics agent is now part of your Service Fabric Virtual Machine Scale Set (VMSS), with any running nodes upgraded, a process that usually takes 20 minutes. Note that the upgrade is performed in a rolling manner, and if your durability level supports it, with zero downtime to your application. Any new nodes created as a result of cluster scaling operations will likewise have the Log Analytics agent automatically deployed.

Azure Service Fabric Performance Counters

With the Log Analytics agent successfully running on each Service Fabric node, we are now ready to start collecting metrics and logs. Luckily for us the Log Analytics agent comes with an understated feature, a built in control plane, meaning we can configure at will which metrics and logs we wish to collect, and at what interval via the Azure Portal.

To do so, in the Azure portal go to the resource group in which you created the Service Fabric Analytics solution. Select the name of your Analytics Workspace:

  1. Click Advanced Settings.
  2. Click Data, then click Windows or Linux Performance Counters.
  3. Select from default / custom performance counters.
  4. Click Save, then click OK.

Refer to official documentation for a full list of recommended Azure Service Fabric cluster performance counters. In addition Service Fabric generates a substantial amount of custom performance counters:

Note: The number of stateful service partitions has a direct correlation to the volume of metrics collected per service. For example an increase in partitions from 5 to 25 would yield a similar jump in volume of metrics and cost of Azure Monitor. As a result, carefully consider and tune the interval for collection of high volume Azure Service Fabric custom performance counters.

Analytics & diagnostics

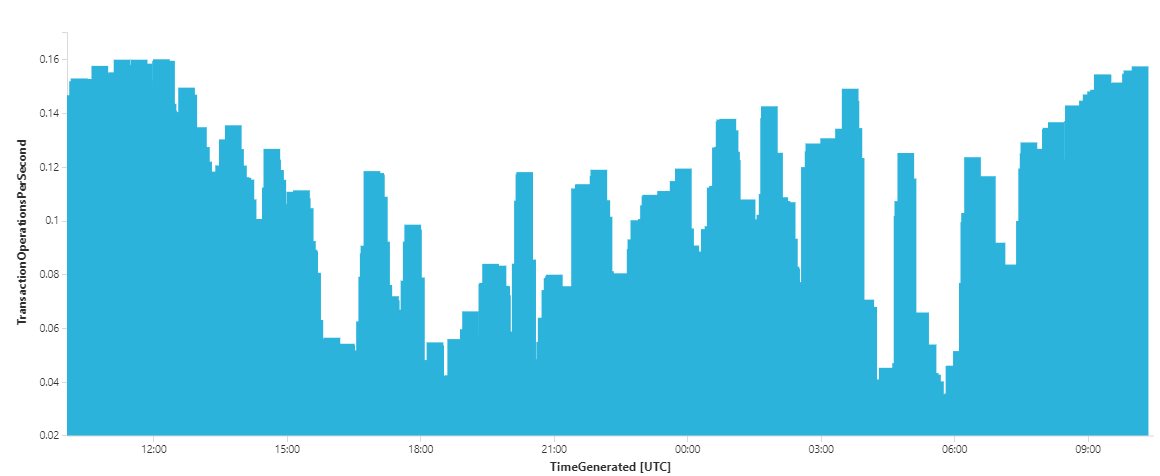
Having configured which performance counters the Log Analytics agent collects, within seconds the data is available in the Azure Monitor workspace for alerting, analytics & diagnostic purposes. For example, we can now visualize the number of Reliable Service new write transactions created per second across the cluster. Select the name of your Analytics Workspace:

  1. Click Logs.
  2. Execute the below Kusto query & click CHART:

Perf | where ObjectName == "Service Fabric Transactional Replicator" and CounterName == "Begin Txn Operations/sec" | summarize TransactionOperationsPerSecond = avg(CounterValue) by bin(TimeGenerated, 1m)

Begin Txn Operations/sec

Summary

In this post, we’ve learned how simple it is to add powerful & unified platform monitoring to your Azure Service Fabric clusters by integrating with the Azure Monitor service. We deployed & configured the Log Analytics agent using the recommended default and custom performance counters, and hopefully highlighted the correlation of stateful service partitions to Azure Monitor cost. Lastly we crafted our very first Log Analytics Kusto query! In future posts we’ll expand our focus to also cover application level telemetry.


References

  1. https://docs.microsoft.com/en-us/azure/service-fabric/service-fabric-diagnostics-oms-agent
  2. https://docs.microsoft.com/en-us/azure/azure-monitor/learn/quick-create-workspace
  3. https://github.com/nilayparikh/AzureScripts/tree/master/Add-OMSAgentVmssExtension
  4. https://docs.microsoft.com/en-us/azure/service-fabric/service-fabric-diagnostics-event-generation-perf
  5. https://docs.microsoft.com/en-us/azure/service-fabric/service-fabric-reliable-services-diagnostics
  6. https://docs.microsoft.com/en-us/azure/service-fabric/service-fabric-reliable-serviceremoting-diagnostics
  7. https://docs.microsoft.com/en-us/azure/service-fabric/service-fabric-reliable-actors-diagnostics

Upgrade your .Net Core Service Fabric Microservices from VS 2015 to VS 2017

Service Fabric projects have evolved at what feels like a cracking pace, along with the .Net Core platform and tooling, and with the recent release of Visual Studio 2017 no doubt you are considering the productivity merits of upgrading (container support). For Service Fabric projects designed in Visual Studio 2015 and using the .Net Core .xproj/project.json structures now deprecated in Visual Studio 2017, the automatic upgrade process may result in only partial conversion success.

In this article we’ll take a look at the issues encountered while upgrading a .Net Core Service Fabric solution containing 77 .xproj/project.json projects to Visual Studio 2017.

From .Net Core Visual Studio 2015 .xproj/project.json to Visual Studio 2017 .csproj

To begin, let’s take a look at a simplified example of a stateful .Net Core microservice defined with the following project.json (VS 2015) structure:

1
2
3
4
5
6
7
8
9
10
11
12
13
14
15
16
17
18
19
20
21
22
23
24
25
26
27
28
29
30
{
"title": "Acme.Service.Auction",
"description": "Acme.Service.Auction",
"version": "1.0.0-*",

"buildOptions": {
"emitEntryPoint": true,
"preserveCompilationContext": true,
"compile": {
"exclude": [
"PackageRoot"
]
}
},

"dependencies": {
"Microsoft.ServiceFabric": "5.1.150",
"Microsoft.ServiceFabric.Services": "2.1.150",
"EnterpriseLibrary.SemanticLogging": "2.0.1406.1"
},

"frameworks": {
"net46": {}
},

"runtimes": {
"win7-x64": {}
}

}

Once the automatic Visual Studio 2017 conversion completes, you’ll end up with a .csproj file similar to the below:

1
2
3
4
5
6
7
8
9
10
11
12
13
14
15
16
17
18
19
20
21
22
23
24
25
26
27
28
29
30
31
32
33
34
35
36
37
38
<Project Sdk="Microsoft.NET.Sdk">

<PropertyGroup>
<Description>Acme.Service.Auction</Description>
<AssemblyTitle>Acme.Service.Auction</AssemblyTitle>
<TargetFramework>net46</TargetFramework>
<PreserveCompilationContext>true</PreserveCompilationContext>
<AssemblyName>Acme.Service.Auction</AssemblyName>
<OutputType>Exe</OutputType>
<PackageId>Acme.Service.Auction</PackageId>
<RuntimeIdentifiers>win7-x64</RuntimeIdentifiers>
<GenerateAssemblyTitleAttribute>false</GenerateAssemblyTitleAttribute>
<GenerateAssemblyDescriptionAttribute>false</GenerateAssemblyDescriptionAttribute>
<GenerateAssemblyConfigurationAttribute>false</GenerateAssemblyConfigurationAttribute>
<GenerateAssemblyCompanyAttribute>false</GenerateAssemblyCompanyAttribute>
<GenerateAssemblyProductAttribute>false</GenerateAssemblyProductAttribute>
<GenerateAssemblyCopyrightAttribute>false</GenerateAssemblyCopyrightAttribute>
<GenerateAssemblyVersionAttribute>false</GenerateAssemblyVersionAttribute>
<GenerateAssemblyFileVersionAttribute>false</GenerateAssemblyFileVersionAttribute>
<IsServiceFabricServiceProject>True</IsServiceFabricServiceProject>
</PropertyGroup>

<ItemGroup>
<Compile Remove="PackageRoot\**\*" />
</ItemGroup>

<ItemGroup>
<PackageReference Include="Microsoft.ServiceFabric" Version="5.1.150" />
<PackageReference Include="Microsoft.ServiceFabric.Services" Version="2.1.150" />
<PackageReference Include="EnterpriseLibrary.SemanticLogging" Version="2.0.1406.1" />
</ItemGroup>

<ItemGroup Condition=" '$(TargetFramework)' == 'net46' ">
<Reference Include="System" />
<Reference Include="Microsoft.CSharp" />
</ItemGroup>

</Project>

Processor architecture mismatch warnings

If you compile the above project, in the build output window you may notice processor architecture mismatch warnings, for example:

1>C:\Microsoft Visual Studio\2017\Enterprise\MSBuild\15.0\Bin\Microsoft.Common.CurrentVersion.targets(1964,5): warning MSB3270: There was a mismatch between the processor architecture of the project being built "MSIL" and the processor architecture of the reference "C:\Users\Admin\.nuget\packages\microsoft.servicefabric.services\2.1.150\lib\net45\Microsoft.ServiceFabric.Services.dll", "AMD64". This mismatch may cause runtime failures. Please consider changing the targeted processor architecture of your project through the Configuration Manager so as to align the processor architectures between your project and references, or take a dependency on references with a processor architecture that matches the targeted processor architecture of your project.

To fix these and similar processor architecture mismatch warnings, replace:

1
<RuntimeIdentifiers>win7-x64</RuntimeIdentifiers>

With this (there is no ending s):

1
<RuntimeIdentifier>win7-x64</RuntimeIdentifier>

Packaging and Publishing… not so fast!

So the converted microservice now compiles without any warnings, what’s all the fuss about… well if you now attempt to package and publish this microservice to Service Fabric, it fails with a message similar to the below:

C:\AcmeAuctions\packages\Microsoft.VisualStudio.Azure.Fabric.MSBuild.1.6.0\build\Microsoft.VisualStudio.Azure.Fabric.Application.targets(248,5): warning MSB3026: Could not copy "C:\AcmeAuctions\src\Acme.Service.Auction\bin\x64\Debug\net46\win7-x64\Acme.Service.Auction.runtimeconfig.json" to "C:\AcmeAuctions\pkg\Debug\Acme.Service.AuctionPkg\Code". Beginning retry 1 in 1000ms. Could not find a part of the path 'C:\AcmeAuctions\pkg\Debug\Acme.Service.AuctionPkg\Code'.

Cross checking various existing github and stackoverflow issues, the current Service Fabric SDK for VS 2017 and msbuild tooling appear not support .Net Core projects for Actor, Stateful and Stateless services defined with Microsoft.NET.Sdk. To clarify, the tooling supports Stateful and Stateless ASP.Net Core service projects only, however I prefer all projects to be in .Net Core, not just my ASP.Net microservices. Hence I replace this:

1
<Project Sdk="Microsoft.NET.Sdk">

With the below; as I expect the above scenario to be resolved in the near future with a SDK and tooling update. I’ve simply switched to a supported Service Fabric and VS 2017 template scenario which is to define all microservice .csproj files using Microsoft.NET.Sdk.Web:

1
<Project Sdk="Microsoft.NET.Sdk.Web">

With this simple change your Service Fabric microservies will support .Net Core Actor, Stateful and Stateless VS 2017 projects and will package and publish normally. Note that in Visual Studio 2017 the project icon will change to a web project, and you may optionally want to git ignore and exclude launchSettings.json files, however given the non-intrusive workaround I believe it’s well worth it. To remove the launchSettings.json file from your project, modify the ItemGroup to:

1
2
3
4
<ItemGroup>
<Compile Remove="PackageRoot\**\*" />
<Content Remove="Properties\launchSettings.json" />
</ItemGroup>

Summary

We’ve looked at some simple changes you can make to your converted and upgraded Service Fabric project files. The changes allow you to write your Actor, Stateful and Stateless services in .Net Core while taking advantage of the great new productivity gains (Azure integration, Docker support etc.) offered by Visual Studio 2017 and Service Fabric!

In our next article we’ll continue the upgrade journey by walking through a few DevOps limitations encountered while reconfiguring a Service Fabric Visual Studio Team Services CI/CD pipeline.

ASP.NET Core DataProtection for Service Fabric with Kestrel & WebListener

In ASP.NET 1.x - 4.x, if you deployed your application to a Web farm, you had to ensure that the configuration files on each server shared the same value for validationKey and decryptionKey, which were used for hashing and decryption respectively. In ASP.NET Core this is accomplished via the data protection stack which was designed to address many of the shortcomings of the old cryptographic stack. The new API provides a simple, easy to use mechanism for data encryption, decryption, key management and rotation. The data protection system ships with several in-box key storage providers; File system, Registry, AzureStorage and Redis.

Since we are working with low-latency microservices at massive scale via Azure Service Fabric, in this blog post we’ll describe an approach to create a custom ASP.NET Core data protection key repository using Service Fabric’s built in Reliable Collections, which are Replicated, Persisted, Asynchronous and Transactional.

Previous readers will note we’ve covered how to integrate ASP.Net Core and Kestrel into Service Fabric, moreover how to create Service Fabric microservices in the new .Net Core xproj structure (soon to be superseded with VS 2017), therefore we’ll jump straight into building the AspNetCore.DataProtection.ServiceFabric microservice (warning this post is code heavy). To test everything out we’ll create a sample ASP.Net Core Web API microservice and finally for completeness integrate WebListener, a Windows only web server.

To begin, we create a new stateful Service Fabric microservice called DataProtectionService:

1
2
3
4
5
6
7
8
9
10
11
12
13
14
15
16
17
18
19
20
21
22
23
24
25
26
27
28
29
30
31
32
33
34
35
36
37
38
39
40
41
42
43
44
45
46
47
48
49
50
51
52
53
54
55
56
57
58
59
60
61
62
63
64
using Microsoft.ServiceFabric.Data;
using Microsoft.ServiceFabric.Data.Collections;
using Microsoft.ServiceFabric.Services.Communication.Runtime;
using Microsoft.ServiceFabric.Services.Remoting.Runtime;
using Microsoft.ServiceFabric.Services.Runtime;
using System;
using System.Collections.Generic;
using System.Fabric;
using System.Threading;
using System.Threading.Tasks;
using System.Xml.Linq;

namespace AspNetCore.DataProtection.ServiceFabric
{
internal sealed class DataProtectionService : StatefulService, IDataProtectionService
{
public DataProtectionService(StatefulServiceContext context, IReliableStateManager stateManager) : base(context, stateManager as IReliableStateManagerReplica)
{


}

protected override IEnumerable<ServiceReplicaListener> CreateServiceReplicaListeners()
{

return new[]
{
new ServiceReplicaListener(context => this.CreateServiceRemotingListener(context))
};
}

public async Task<List<XElement>> GetAllDataProtectionElements()
{
var elements = new List<XElement>();

var dictionary = await this.StateManager.GetOrAddAsync<IReliableDictionary<Guid, XElement>>("AspNetCore.DataProtection");
using (var tx = this.StateManager.CreateTransaction())
{
var enumerable = await dictionary.CreateEnumerableAsync(tx);
var enumerator = enumerable.GetAsyncEnumerator();
var token = new CancellationToken();

while (await enumerator.MoveNextAsync(token))
{
elements.Add(enumerator.Current.Value);
}
}

return elements;
}

public async Task<XElement> AddDataProtectionElement(XElement element)
{

Guid id = Guid.Parse(element.Attribute("id").Value);

var dictionary = await this.StateManager.GetOrAddAsync<IReliableDictionary<Guid, XElement>>("AspNetCore.DataProtection");
using (var tx = this.StateManager.CreateTransaction())
{
var result = await dictionary.GetOrAddAsync(tx, id, element);
await tx.CommitAsync();

return result;
}
}
}
}

Congratulations you’ve just implemented a custom key storage provider using a Service Fabric Reliable Dictionary! To integrate with ASP.Net Core Data Protection API we need to also create a ServiceFabricXmlRepository class which implements IXmlRepository. In a new stateless microservice called ServiceFabric.DataProtection.Web create ServiceFabricXmlRepository:

1
2
3
4
5
6
7
8
9
10
11
12
13
14
15
16
17
18
19
20
21
22
23
24
25
26
27
28
29
30
using AspNetCore.DataProtection.ServiceFabric;
using Microsoft.AspNetCore.DataProtection.Repositories;
using Microsoft.ServiceFabric.Services.Client;
using Microsoft.ServiceFabric.Services.Remoting.Client;
using System;
using System.Collections.Generic;
using System.Xml.Linq;

namespace ServiceFabric.DataProtection.Web
{
public class ServiceFabricXmlRepository : IXmlRepository
{
public IReadOnlyCollection<XElement> GetAllElements()
{

var proxy = ServiceProxy.Create<IDataProtectionService>(new Uri("fabric:/ServiceFabric.DataProtection/DataProtectionService"), new ServicePartitionKey());
return proxy.GetAllDataProtectionElements().Result.AsReadOnly();
}

public void StoreElement(XElement element, string friendlyName)
{

if (element == null)
{
throw new ArgumentNullException(nameof(element));
}

var proxy = ServiceProxy.Create<IDataProtectionService>(new Uri("fabric:/ServiceFabric.DataProtection/DataProtectionService"), new ServicePartitionKey());
proxy.AddDataProtectionElement(element).Wait();
}
}
}

To easily bootstrap our custom ServiceFabricXmlRepository into ASP.Net Core on start-up, create the following DataProtectionBuilderExtensions class:

1
2
3
4
5
6
7
8
9
10
11
12
13
14
15
16
17
18
19
20
21
22
23
24
25
26
27
28
29
30
31
32
33
34
35
36
37
38
39
40
41
42
43
44
45
using Microsoft.AspNetCore.DataProtection;
using Microsoft.AspNetCore.DataProtection.Repositories;
using Microsoft.Extensions.DependencyInjection;
using System;

namespace ServiceFabric.DataProtection.Web
{
public static class DataProtectionBuilderExtensions
{
public static IDataProtectionBuilder PersistKeysToServiceFabric(this IDataProtectionBuilder builder)
{

if (builder == null)
{
throw new ArgumentNullException(nameof(builder));
}

return builder.Use(ServiceDescriptor.Singleton<IXmlRepository>(services => new ServiceFabricXmlRepository()));
}

public static IDataProtectionBuilder Use(this IDataProtectionBuilder builder, ServiceDescriptor descriptor)
{

if (builder == null)
{
throw new ArgumentNullException(nameof(builder));
}

if (descriptor == null)
{
throw new ArgumentNullException(nameof(descriptor));
}

for (int i = builder.Services.Count - 1; i >= 0; i--)
{
if (builder.Services[i]?.ServiceType == descriptor.ServiceType)
{
builder.Services.RemoveAt(i);
}
}

builder.Services.Add(descriptor);

return builder;
}
}
}

Building upon previous articles detailing how to integrate Kestrel and Service Fabric, we extend WebHostBuilderHelper to also support the WebListener webserver:

1
2
3
4
5
6
7
8
9
10
11
12
13
14
15
16
17
18
19
20
21
22
23
24
25
26
27
28
29
30
31
32
33
34
35
36
37
38
39
40
41
42
43
44
45
46
47
48
49
50
51
52
53
54
55
56
57
58
59
60
61
using Microsoft.AspNetCore.Hosting;
using Microsoft.Net.Http.Server;
using System.Fabric;
using System.IO;

namespace ServiceFabric.DataProtection.Web
{
internal static class WebHostBuilderHelper
{
public static IWebHost GetServiceFabricWebHost(ServerType serverType)
{

var endpoint = FabricRuntime.GetActivationContext().GetEndpoint("ServiceEndpoint");
string serverUrl = $"{endpoint.Protocol}://{FabricRuntime.GetNodeContext().IPAddressOrFQDN}:{endpoint.Port}";

return GetWebHost(endpoint.Protocol.ToString(), endpoint.Port.ToString(), serverType);
}

public static IWebHost GetWebHost(string protocol, string port, ServerType serverType)
{

switch (serverType)
{
case ServerType.WebListener:
{
IWebHostBuilder webHostBuilder = new WebHostBuilder()
.UseWebListener(options =>
{
options.ListenerSettings.Authentication.Schemes = AuthenticationSchemes.None;
options.ListenerSettings.Authentication.AllowAnonymous = true;
});

return ConfigureWebHostBuilder(webHostBuilder, protocol, port);
}
case ServerType.Kestrel:
{
IWebHostBuilder webHostBuilder = new WebHostBuilder();
webHostBuilder.UseKestrel();

return ConfigureWebHostBuilder(webHostBuilder, protocol, port);
}
default:
return null;
}
}

static IWebHost ConfigureWebHostBuilder(IWebHostBuilder webHostBuilder, string protocol, string port)
{

return webHostBuilder
.UseContentRoot(Directory.GetCurrentDirectory())
.UseWebRoot(Path.Combine(Directory.GetCurrentDirectory(), "wwwroot"))
.UseStartup<Startup>()
.UseUrls($"{protocol}://+:{port}")
.Build();
}
}

enum ServerType
{
Kestrel,
WebListener
}
}

Your Web microservice should look something like:

1
2
3
4
5
6
7
8
9
10
11
12
13
14
15
16
17
18
19
20
21
22
23
24
25
26
27
28
29
30
31
32
33
34
35
36
37
38
39
40
41
42
43
44
45
46
47
48
using Microsoft.ServiceFabric.Services.Communication.AspNetCore;
using Microsoft.ServiceFabric.Services.Communication.Runtime;
using Microsoft.ServiceFabric.Services.Runtime;
using System.Collections.Generic;
using System.Fabric;

namespace ServiceFabric.DataProtection.Web
{
internal sealed class WebService : StatelessService
{
ServerType _serverType;

public WebService(StatelessServiceContext context, ServerType serverType)
: base(context)
{

_serverType = serverType;
}

protected override IEnumerable<ServiceInstanceListener> CreateServiceInstanceListeners()
{

return new ServiceInstanceListener[]
{
new ServiceInstanceListener(serviceContext =>
{
switch (_serverType)
{
case ServerType.WebListener :
{
return new WebListenerCommunicationListener(serviceContext, "ServiceEndpoint", url =>
{
return WebHostBuilderHelper.GetServiceFabricWebHost(_serverType);
});
}
case ServerType.Kestrel:
{
return new KestrelCommunicationListener(serviceContext, "ServiceEndpoint", url =>
{
return WebHostBuilderHelper.GetServiceFabricWebHost(_serverType);
});
}
default:
return null;
}
})
};
}
}
}

Next modify Program.cs with below code:

1
2
3
4
5
6
7
8
9
10
11
12
13
14
15
16
17
18
19
20
21
22
23
24
25
26
27
28
29
30
31
32
33
34
35
36
37
38
39
40
41
42
43
44
45
46
47
48
49
50
51
52
53
54
55
56
57
58
59
60
61
62
63
64
65
66
67
68
69
70
71
72
73
74
75
76
77
78
79
80
using CommandLine;
using Microsoft.AspNetCore.Hosting;
using Microsoft.ServiceFabric.Services.Runtime;
using System;
using System.Threading;

namespace ServiceFabric.DataProtection.Web
{
internal static class Program
{
public static void Main(string[] args)
{

var parser = new Parser(with =>
{
with.EnableDashDash = true;
with.HelpWriter = Console.Out;
});

var result = parser.ParseArguments<Options>(args);

result.MapResult(options =>
{
switch (options.Host.ToLower())
{
case "servicefabric-weblistener":
{
ServiceRuntime.RegisterServiceAsync("WebServiceType", context => new WebService(context, ServerType.WebListener)).GetAwaiter().GetResult();
Thread.Sleep(Timeout.Infinite);
break;
}
case "servicefabric-kestrel":
{
ServiceRuntime.RegisterServiceAsync("WebServiceType", context => new WebService(context, ServerType.Kestrel)).GetAwaiter().GetResult();
Thread.Sleep(Timeout.Infinite);
break;
}
case "weblistener":
{
using (var host = WebHostBuilderHelper.GetWebHost(options.Protocol, options.Port, ServerType.WebListener))
{
host.Run();
}
break;
}
case "kestrel":
{
using (var host = WebHostBuilderHelper.GetWebHost(options.Protocol, options.Port, ServerType.Kestrel))
{
host.Run();
}
break;
}
default:
break;
}

return 0;
},
errors =>
{
return 1;
});
}
}

internal sealed class Options
{
[Option(Default = "weblistener", HelpText = "Host - Options [weblistener] or [kestrel] or [servicefabric-weblistener] or [servicefabric-kestrel]")]
public string Host { get; set; }

[Option(Default = "http", HelpText = "Protocol - Options [http] or [https]")]
public string Protocol { get; set; }

[Option(Default = "localhost", HelpText = "IP Address or Uri - Example [localhost] or [127.0.0.1]")]
public string IpAddressOrFQDN { get; set; }

[Option(Default = "5000", HelpText = "Port - Example [80] or [5000]")]
public string Port { get; set; }
}
}

And finally PersistKeysToServiceFabric needs to be added to Startup.cs as this will instruct the ASP.NET Core data protection stack to use our custom AspNetCore.DataProtection.ServiceFabric key repository:

1
2
3
4
5
6
7
8
9
10
11
12
13
14
15
16
17
18
19
20
21
22
23
24
25
26
27
28
29
30
31
32
33
34
35
36
37
38
39
40
41
42
43
44
45
46
47
48
49
50
51
52
53
using Microsoft.AspNetCore.Builder;
using Microsoft.AspNetCore.DataProtection;
using Microsoft.AspNetCore.Hosting;
using Microsoft.Extensions.Configuration;
using Microsoft.Extensions.DependencyInjection;
using Microsoft.Extensions.Logging;
using Swashbuckle.AspNetCore.Swagger;

namespace ServiceFabric.DataProtection.Web
{
public class Startup
{
public Startup(IHostingEnvironment env)
{

var builder = new ConfigurationBuilder()
.SetBasePath(env.ContentRootPath)
.AddJsonFile("appsettings.json", optional: true, reloadOnChange: true)
.AddJsonFile($"appsettings.{env.EnvironmentName}.json", optional: true)
.AddEnvironmentVariables();
Configuration = builder.Build();
}

public IConfigurationRoot Configuration { get; }

// This method gets called by the runtime. Use this method to add services to the container.
public void ConfigureServices(IServiceCollection services)
{

// Add framework services.
services.AddMvc();

// Add Service Fabric DataProtection
services.AddDataProtection()
.SetApplicationName("ServiceFabric-DataProtection-Web")
.PersistKeysToServiceFabric();

services.AddSwaggerGen(c =>
{
c.SwaggerDoc("v1", new Info { Title = "AspNetCore.DataProtection.ServiceFabric API", Version = "v1" });
});
}

// This method gets called by the runtime. Use this method to configure the HTTP request pipeline.
public void Configure(IApplicationBuilder app, IHostingEnvironment env, ILoggerFactory loggerFactory)
{

app.UseMvc();
app.UseSwaggerUi(c =>
{
c.SwaggerEndpoint("/swagger/v1/swagger.json", "AspNetCore.DataProtection.ServiceFabric API v1");
});
app.UseSwagger();
}
}
}

All that is now left to do is within your .Net Core Web Application PackageRoot, edit the ServiceManifest.xml CodePackage so that we tell Web.exe to “host” within Service Fabric using WebListener:

1
2
3
4
5
6
7
8
9
10
<CodePackage Name="Code" Version="1.0.0">
<EntryPoint>
<ExeHost>
<Program>ServiceFabric.DataProtection.Web.exe</Program>
<Arguments>--host servicefabric-weblistener</Arguments>
<WorkingFolder>CodePackage</WorkingFolder>
<ConsoleRedirection FileRetentionCount="5" FileMaxSizeInKb="2048" />
</ExeHost>
</EntryPoint>
</CodePackage>

At an administrative command prompt you’ll need to issue the below command to create the correct Url ACL for port 80 (please refer to the WebListener references section below for detailed instructions):

netsh http add urlacl url=http://+:80/ user=Users

Upon successful deployment to a multi-node cluster, use Swagger and the Protect/Unprotect APIs to test that all nodes have access to the same data protection keys:

ASP.Net Core DataProtection ServiceFabric Swagger API

Note, as we've created a custom ASP.NET Core data protection key repository, the data protection system will deregister the default key encryption at rest mechanism that the heuristic provided, so keys will no longer be encrypted at rest. It is strongly recommended that you additionally specify an explicit key encryption mechanism for production applications.


References

  1. https://msdn.microsoft.com/en-us/library/ff649308.aspx#paght000007_webfarmdeploymentconsiderations
  2. https://docs.microsoft.com/en-us/aspnet/core/security/data-protection/introduction
  3. https://docs.microsoft.com/en-us/aspnet/core/security/data-protection/implementation/key-storage-providers
  4. https://docs.microsoft.com/en-us/azure/service-fabric/service-fabric-reliable-services-reliable-collections
  5. https://docs.microsoft.com/en-us/aspnet/core/fundamentals/servers/weblistener
  6. https://docs.microsoft.com/en-us/aspnet/core/fundamentals/servers/kestrel

Application Insights & Semantic Logging for Service Fabric Microservices

Borrowing heavily from MSDN documentation, the term semantic logging refers specifically to the use of strongly typed events and consistent structure of log messages. In Service Fabric sematic logging is baked right into the platform and tooling. For example if we look at any auto generated .cs file for an actor, stateful or stateless service we see examples of logging via the ServiceEventSource or ActorEventSource classes:

ServiceEventSource.Current.ServiceTypeRegistered(Process.GetCurrentProcess().Id, typeof(AcmeService).Name);

When an event such as the one above is logged, it includes a payload containing individual variables as typed values that match a pre-defined schema. Moreover as we’ll see later on in this article, when the event is routed to a suitable destination such as Application Insights, the event’s payload is written as discrete elements making it much easier to analyse, correlate and query. For those new to Application Insights the following offical introduction provides a good starting point.

Having briefly defined semantic logging and mentioning that it’s baked into Service Fabric we should clarify that ServiceEventSource and ActorEventSource inherit from EventSource, which in turn writes events to ETW. Event Tracing for Windows or more commonly ETW is an efficient kernel-level tracing facility built into Windows that logs kernel or application-defined events.

Given the above we now turn our attention to exporting these ETW events to Application Insights or for that matter to any other supported target via two libraries, the Microsoft library aptly named Semantic Logging (formerly known as the Semantic Logging Application Block or SLAB) and the SemanticLogging.ApplicationInsights library (also known as SLAB_AppInsights).

As all my Service Fabric projects are in .Net Core xproj structure (see previous articles) I ended up contributing to Fidel’s excellent library by converting the SemanticLogging.ApplicationInsights project to .Net Core xproj. My humble contribution has been merged into the master SemanticLogging.ApplicationInsights branch by Fidel and is used in the rest of the article below. As the NuGet package is somewhat behind, we’ll first start by downloading the master branch directly from GitHub and by adding it to our Visual Studio 2015 solution. Your solution will end-up looking something like this:

Semantic Logging & Application Insights

In your Service Fabric service (in my example AcmeService) edit the project.json:

1
2
3
4
5
6
7
8
9
10
11
12
13
14
15
16
17
18
19
20
21
22
23
24
25
26
27
28
29
30
31
32
33
34
35
36
37
{
"title": "AcmeService",
"description": "AcmeService",
"version": "1.0.0-*",

"buildOptions": {
"emitEntryPoint": true,
"preserveCompilationContext": true,
"compile": {
"exclude": [
"PackageRoot"
]
}
},

"dependencies": {
"Microsoft.ServiceFabric": "5.1.150",
"Microsoft.ServiceFabric.Services": "2.1.150",
"EnterpriseLibrary.SemanticLogging": "2.0.1406.1",
"SemanticLogging.ApplicationInsights": "1.0.0-*",
"Microsoft.Extensions.PlatformAbstractions": "1.0.0",
"Microsoft.Extensions.Configuration": "1.0.0",
"Microsoft.Extensions.Configuration.FileExtensions": "1.0.0",
"Microsoft.Extensions.Configuration.Json": "1.0.0",
"Microsoft.Extensions.Configuration.Binder": "1.0.0"
},

"frameworks": {
"net46": {
}
},

"runtimes": {
"win7-x64": {}
}

}

Add an appsettings.Development.json file and make sure to set your ASPNETCORE_ENVIRONMENT variable accordingly. Moreover you will need to set the Application Insights InstrumentationKey.

1
2
3
4
5
6
7
8
9
10
11
12
13
{
"Logging": {
"IncludeScopes": false,
"LogLevel": {
"Default": "Debug",
"System": "Information",
"Microsoft": "Information"
}
},
"ApplicationInsights": {
"InstrumentationKey": "YOUR KEY GOES HERE"
}
}

We’ll add an AppSettings class so that we can bind our settings file to a strongly typed object:

1
2
3
4
5
6
7
8
9
10
11
12
13
14
15
16
17
namespace AcmeService
{
public class AppSettings
{
public AppSettings()
{

ApplicationInsights = new ApplicationInsightsOptions();
}

public ApplicationInsightsOptions ApplicationInsights { get; set; }
}

public class ApplicationInsightsOptions
{
public string InstrumentationKey { get; set; }
}
}

In a previous article we looked out how to share Asp.Net Core appsettings.json with Service Fabric Microservices so we’ll re-use the same logic and create a ConfigurationHelper:

1
2
3
4
5
6
7
8
9
10
11
12
13
14
15
16
17
18
19
20
21
22
23
24
25
26
27
28
29
30
31
32
33
34
35
36
37
using Microsoft.Extensions.PlatformAbstractions;
using Microsoft.Extensions.Configuration;
using System;

namespace AcmeService
{
public static class ConfigurationHelper
{
public static AppSettings GetAppSettings()
{

var appSettings = new AppSettings();
var configRoot = GetConfigurationRoot();
configRoot.Bind(appSettings);

return appSettings;
}

public static IConfigurationRoot GetConfigurationRoot()
{

IConfigurationRoot configuration = null;

var basePath = PlatformServices.Default.Application.ApplicationBasePath;
var environmentName = Environment.GetEnvironmentVariable("ASPNETCORE_ENVIRONMENT");

if (!string.IsNullOrEmpty(environmentName))
{
var configurationBuilder = new ConfigurationBuilder()
.SetBasePath(basePath)
.AddJsonFile($"appsettings.{environmentName}.json");

configuration = configurationBuilder.Build();
}

return configuration;
}
}
}

Now for the secret sauce, we create a LoggingHelper class which returns an ObservableEventListener. The class configures the Application Insights sink from the SemanticLogging.ApplicationInsights library:

listener.LogToApplicationInsights(...)

and subscribes to Service Fabric ServiceEventSource events using the Semantic Logging library:

listener.EnableEvents(ServiceEventSource.Current.Name, EventLevel.Verbose);

1
2
3
4
5
6
7
8
9
10
11
12
13
14
15
16
17
18
19
20
21
22
23
24
25
26
27
28
29
30
31
32
33
34
35
36
37
using Microsoft.ApplicationInsights.Extensibility;
using Microsoft.Practices.EnterpriseLibrary.SemanticLogging;
using System;
using System.Collections.Generic;
using System.Diagnostics.Tracing;

namespace AcmeService
{
public static class LoggingHelper
{
public static ObservableEventListener GetEventListener()
{

ObservableEventListener listener = new ObservableEventListener();

try
{
var appSettings = ConfigurationHelper.GetAppSettings();

if (appSettings != null)
{
TelemetryConfiguration.CreateDefault();
TelemetryConfiguration.Active.InstrumentationKey = appSettings.ApplicationInsights.InstrumentationKey;

listener.LogToApplicationInsights(TelemetryConfiguration.Active.InstrumentationKey, new List<ITelemetryInitializer>(TelemetryConfiguration.Active.TelemetryInitializers).ToArray());
}

listener.EnableEvents(ServiceEventSource.Current.Name, EventLevel.Verbose);
}
catch (Exception ex)
{
ServiceEventSource.Current.Message(ex.ToString());
}

return listener;
}
}
}

All that is now left is the addition of a “one liner” to your Service Fabric Microservice (Program.cs) to enable Semantic Logging:

private static readonly ObservableEventListener _listener = LoggingHelper.GetEventListener();

1
2
3
4
5
6
7
8
9
10
11
12
13
14
15
16
17
18
19
20
21
22
23
24
25
26
27
28
29
30
31
32
33
34
35
using Microsoft.Practices.EnterpriseLibrary.SemanticLogging;
using Microsoft.ServiceFabric.Services.Runtime;
using System;
using System.Diagnostics;
using System.Threading;

namespace AcmeService
{
internal static class Program
{
private static readonly ObservableEventListener _listener = LoggingHelper.GetEventListener();

/// <summary>
/// This is the entry point of the service host process.
/// </summary>
private static void Main()
{

try
{
ServiceRuntime.RegisterServiceAsync("LoggingServiceType",
context => new LoggingService(context)).GetAwaiter().GetResult();

ServiceEventSource.Current.ServiceTypeRegistered(Process.GetCurrentProcess().Id, typeof(LoggingService).Name);

// Prevents this host process from terminating so services keep running.
Thread.Sleep(Timeout.Infinite);
}
catch (Exception e)
{
ServiceEventSource.Current.ServiceHostInitializationFailed(e.ToString());
throw;
}
}
}
}

And that’s about it… how simple is it to get your Service Fabric application events sent to Application Insights! Given the event producer (your Service Fabric application) is decoupled from the target through the magic of ETW and Semantic Logging libraries, the exact same approach and with minimal code changes successfully allows me to target Elastic Search as the event target. In fact for your systems you might also prefer to send some events to Application Insights and others to an Elastic Search cluster. Lastly I would like to conclude by saying if you find any of the above useful in your projects do consider contributing to Fidel’s excellent library or by creating completely new sinks for Semantic Logging!


References

  1. https://msdn.microsoft.com/en-us/library/dn440729(v=pandp.60).aspx
  2. https://msdn.microsoft.com/en-us/library/dn775014(v=pandp.20).aspx
  3. https://msdn.microsoft.com/en-us/library/windows/desktop/aa363668.aspx
  4. https://github.com/mspnp/semantic-logging
  5. https://github.com/fidmor89/SLAB_AppInsights
  6. https://azure.microsoft.com/en-us/documentation/articles/app-insights-overview/

Share Asp.Net Core appsettings.json with Service Fabric Microservices

If you’ve been working with Service Fabric you would have most likely come across the need to store configuration variables somewhere. This usually means defining and overriding parameters in the following files across various projects:

ApplicationPackageRoot\ApplicationManifest.xml
ApplicationParameters\Local.xml
PackageRoot\Config\Settings.xml

As all my microservice and library projects have been converted over to the new .Net Core xproj structure, I wanted to consolidate and share the same settings .json files used in my .Net Core Web project across the entire solution whilst still maintaining the ability to deploy/publish individual microsevices. Taking inspiration from how this is achieved in .Net Core and as I’m targeting .Net Core RC2, I created the following appsettings.json files in my Web project, corresponding to the ASPNETCORE_ENVIRONMENT variable:

appsettings.json
appsettings.Development.json
appsettings.Staging.json
appsettings.Production.json

Example Web project appsettings.Development.json:

1
2
3
4
5
6
7
8
9
10
11
12
13
{
"Logging": {
"IncludeScopes": false,
"LogLevel": {
"Default": "Debug",
"System": "Information",
"Microsoft": "Information"
}
},
"ApplicationInsights": {
"InstrumentationKey": ""
}
}

For completeness the Web project.json file should also define a custom publishOptions:

1
2
3
4
5
6
7
8
9
10
"publishOptions": {
"include": [
"wwwroot",
"Views",
"appsettings.Development.json",
"appsettings.Staging.json",
"appsettings.Production.json",
"web.config"
]
},

Next we need to create either a common .Net Core library project or within each microservice project add the following class:

1
2
3
4
5
6
7
8
9
10
11
12
13
14
15
16
17
18
19
20
21
22
23
24
25
26
27
28
29
30
31
32
33
34
35
36
37
using Microsoft.Extensions.PlatformAbstractions;
using Microsoft.Extensions.Configuration;
using System;

namespace Acme.Helpers
{
public static class ConfigurationHelper
{
public static ApplicationOptions GetConfiguration()
{

var appSettings = new AppSettings();
var configRoot = GetConfigurationRoot();
configRoot.Bind(appSettings);

return result;
}

public static IConfigurationRoot GetConfigurationRoot()
{

IConfigurationRoot configuration = null;

var basePath = PlatformServices.Default.Application.ApplicationBasePath;
var environmentName = Environment.GetEnvironmentVariable(Acme.ASPNETCORE_ENVIRONMENT);

if (!string.IsNullOrEmpty(environmentName))
{
var configurationBuilder = new ConfigurationBuilder()
.SetBasePath(basePath)
.AddJsonFile($"appsettings.{environmentName}.json");

configuration = configurationBuilder.Build();
}

return configuration;
}
}
}

Note: the value of Acme.ASPNETCORE_ENVIRONMENT is "ASPNETCORE_ENVIRONMENT". Make sure ASPNETCORE_ENVIRONMENT is set on your target environment accordingly. Moreover the AppSettings class definition must correspond to the content of your appsettings.json file, as otherwise the configRoot.Bind(appSettings) will fail.

In each microservice project.json we’ll also need to add custom postcompile and postpublish scripts, with the complete file looking something like this:

1
2
3
4
5
6
7
8
9
10
11
12
13
14
15
16
17
18
19
20
21
22
23
24
25
26
27
28
29
30
31
32
33
34
35
36
37
38
39
40
41
42
43
44
45
46
47
48
49
50
51
{
"title": "Acme.Service.Clock",
"description": "Acme.Service.Clock",
"version": "1.0.0-*",

"buildOptions": {
"emitEntryPoint": true,
"preserveCompilationContext": true,
"compile": {
"exclude": [
"PackageRoot"
]
}
},

"dependencies": {
"Microsoft.ServiceFabric": "5.1.150",
"Microsoft.ServiceFabric.Actors": "2.1.150",
"Microsoft.ServiceFabric.Data": "2.1.150",
"Microsoft.ServiceFabric.Services": "2.1.150",
"Microsoft.Framework.Configuration": "1.0.0-beta8",
"Microsoft.Framework.Configuration.Json": "1.0.0-beta8",
"Microsoft.Extensions.Configuration.EnvironmentVariables": "1.0.0-rc2-final",
"Microsoft.Extensions.PlatformAbstractions": "1.0.0-rc2-final",
"Microsoft.Extensions.Configuration.Binder": "1.0.0-rc2-final",
"Microsoft.Extensions.Configuration.FileExtensions": "1.0.0-rc2-final",
"Microsoft.Extensions.Configuration.Json": "1.0.0-rc2-final"
},

"scripts": {
"postcompile": [
"xcopy /Y ..\\Web\\appsettings.Development.json %compile:OutputDir%\\win7-x64\\appsettings.Development.json*",
"xcopy /Y ..\\Web\\appsettings.Staging.json %compile:OutputDir%\\win7-x64\\appsettings.Staging.json*",
"xcopy /Y ..\\Web\\appsettings.Production.json %compile:OutputDir%\\win7-x64\\appsettings.Production.json*"
],
"postpublish": [
"xcopy /Y ..\\Web\\appsettings.Development.json %publish:OutputPath%",
"xcopy /Y ..\\Web\\appsettings.Staging.json %publish:OutputPath%",
"xcopy /Y ..\\Web\\appsettings.Production.json %publish:OutputPath%"
]
},

"frameworks": {
"net46": { }
},

"runtimes": {
"win7-x64": { }
}

}

Note: for the scripts to work, adjust the location of the appsettings.json files to be relative to your solution and project structure

With the above changes in place, whenever you now compile your microservice projects or deploy/publish them to a Service Fabric cluster, the corresponding appsettings.json files will also be copied, packaged and deployed! Moreover access to configuration variables within the appsettings.json file is achieved through the same low friction and strongly typed/bound mechanism as used in Asp.Net Core projects. The code would look something like:

1
2
3
4
5
6
var configuration = ConfigurationHelper.GetConfiguration();

if (configuration != null)
{
var instrumentationKey = configuration.ApplicationInsights.InstrumentationKey;
}

A final word, for production scenarios it is recommended that the content of appsettings.json be encrypted, in addition to the above ConfigurationHelper code being extended to support reloadOnChange events. Maybe a topic for future posts…

Create or convert your Service Fabric Microservices to .Net Core xproj structure

In a previous article we walked through the process of hosting our Asp.Net Core Web Microservice within Service Fabric and also self-hosting outside Service Fabric via Kestrel for development and debugging. Today we’ll discuss how we can create a new .Net Core Service Fabric Microservice targeting the full stack (.net46), given the VS 2015 template only supports web projects currently. Note that similar principles would apply to converting existing Microservice projects to .Net Core xproj structure.

To begin, in Visual Studio 2015 add a new Service Fabric Project, in my example a Stateful Service named AcmeService:

New Service Fabric project

Once complete you should have a solution resembling the below:

Service Fabric solution

What we do next is remove the AcmeService project from the solution altogether and rename the folder to AcmeService.tmp. We will re-create the project as a .Net Core Console Application. Select Add New Project and select Console Application (.Net Core), making sure the location is the same as the original and enter AcmeService as the project name:

AcmeService as a .Net Core Console project

From the AcmeService.tmp folder copy:

PackageRoot folder
Properties folder
AcmeService.cs (copy over target file)
Program.cs
ServiceEventSource.cs

to the AcmeService folder, your solution resembling:

Service Fabric solution with .Net Core xproj structure

Copy the contents of the below into your project.json file:

1
2
3
4
5
6
7
8
9
10
11
12
13
14
15
16
17
18
19
20
21
22
23
24
25
26
27
28
29
30
{
"title": "AcmeService",
"description": "AcmeService",
"copyright": "Copyright © Acme 2016",
"version": "1.0.0-*",

"buildOptions": {
"emitEntryPoint": true,
"preserveCompilationContext": true,
"compile": {
"exclude": [
"PackageRoot"
]
}
},

"dependencies": {
"Microsoft.ServiceFabric": "5.1.150",
"Microsoft.ServiceFabric.Services": "2.1.150"
},

"frameworks": {
"net46": { }
},

"runtimes": {
"win7-x64": { }
}

}

Lastly we have to add back our .Net Core Console Application project by right clicking on the Service Fabric project and selecting Add Existing Service Fabric Service. You might get a warning about updating but just click OK. You can also delete the AcmeService.tmp folder as it’s no longer needed.

To compile you can use Visual Studio or at a command prompt you can issue normal dotnet.exe commands, for example:

dotnet.exe build

In the next series of articles we’ll look at some more advanced topics such as sharing appsettings.json files between Web and other Microservice projects, as well as logging to Application Insights.

Asp.Net Core with Kestrel and Service Fabric

Service Fabric SDK 2.1.150 comes with an ASP.NET Core project template so you can easily include a web app or web service in your Service Fabric application. To get started follow this official article: Build a web service front end for your application, but for more advanced scenarios such as hosting your .Net Core web application outside Service Fabric (for those times you just don’t want to deploy), forcing Kestrel to listen to all machine assigned IP addresses, we’ll customise and extend the starter template generated code. Moreover, with .Net Core RC2 and RTM the ubiquitous dotnet.exe becomes our preferred tool of choice so let’s facilitate running your Service Fabric Web app for development and debugging with the same simple command dotnet.exe run.

As always and given I am still targeting .Net Core RC2, we’ll start with the required project.json dependencies which should look something like the below. For command line argument heavily lifting include the “CommandLineParser”: “2.0.275-beta” package.

1
2
3
4
5
6
7
8
9
10
11
12
13
14
15
16
17
18
19
20
21
22
23
24
25
26
27
"dependencies": {
"Microsoft.AspNetCore.Hosting": "1.0.0-rc2-final",
"Microsoft.AspNetCore.Authentication": "1.0.0-rc2-final",
"Microsoft.AspNetCore.Authentication.Cookies": "1.0.0-rc2-final",
"Microsoft.AspNetCore.Authentication.JwtBearer": "1.0.0-rc2-final",
"Microsoft.AspNetCore.Authentication.OpenIdConnect": "1.0.0-rc2-final",
"Microsoft.AspNetCore.Diagnostics": "1.0.0-rc2-final",
"Microsoft.AspNetCore.SpaServices": "1.0.0-beta-000004",
"Microsoft.AspNetCore.StaticFiles": "1.0.0-rc2-final",
"Microsoft.AspNetCore.Mvc": "1.0.0-rc2-final",
"Microsoft.AspNetCore.Mvc.Formatters.Json": "1.0.0-rc2-final",
"Microsoft.AspNetCore.Server.Kestrel": "1.0.0-rc2-final",
"Microsoft.Extensions.Configuration.Abstractions": "1.0.0-rc2-final",
"Microsoft.Extensions.Configuration.EnvironmentVariables": "1.0.0-rc2-final",
"Microsoft.Extensions.Configuration.FileExtensions": "1.0.0-rc2-final",
"Microsoft.Extensions.Configuration.Json": "1.0.0-rc2-final",
"Microsoft.IdentityModel.Clients.ActiveDirectory": "3.9.302261508-alpha",
"Microsoft.Extensions.Configuration.Binder": "1.0.0-rc2-final",
"Swashbuckle": "6.0.0-beta9",
"Swashbuckle.SwaggerUi": "6.0.0-beta9",
"Swashbuckle.SwaggerGen": "6.0.0-beta9",
"CommandLineParser": "2.0.275-beta",
"Microsoft.ServiceFabric": "5.1.150",
"Microsoft.ServiceFabric.Data": "2.1.150",
"Microsoft.ServiceFabric.Services": "2.1.150",
"Microsoft.AspNetCore.Http.Abstractions": "1.0.0-rc2-final"
}

In your Program.cs which contains the generated starter template code add the following usings:

1
2
3
4
5
6
7
8
9
using CommandLine;
using Microsoft.AspNetCore.Hosting;
using Microsoft.ServiceFabric.Services.Communication.Runtime;
using Microsoft.ServiceFabric.Services.Runtime;
using System;
using System.Collections.Generic;
using System.Fabric;
using System.Threading;
using System.Threading.Tasks;

Since we want to host our .Net Core web application both within Service Fabric and outside for quick turnaround during development and debugging without the hassle of always deploying, we modify Main to support both scenarios:

1
2
3
4
5
6
7
8
9
10
11
12
13
14
15
16
17
18
19
20
21
22
23
24
25
26
27
28
29
30
31
public static void Main(string[] args)
{

var parser = new Parser(with => {
with.EnableDashDash = true;
with.HelpWriter = Console.Out;
});

var result = parser.ParseArguments<Options>(args);

result.MapResult(
options =>
{
if (options.Host.ToLower() == AcmeConstants.ServiceFabricHost)
{
ServiceRuntime.RegisterServiceAsync("WebType", context => new WebHostingService(context, "WebTypeEndpoint")).GetAwaiter().GetResult();
Thread.Sleep(Timeout.Infinite);
}
else if(options.Host.ToLower() == AcmeConstants.SelfHost)
{
using (var host = WebHostBuilderHelper.GetWebHost(new WebHostBuilder(), options.Protocol, options.Port))
{
host.Run();
}
}
return 0;
},
errors =>
{
return 1;
});
}

AcmeConstants.ServiceFabricHost - value of command line argument: service-fabric-host
AcmeConstants.SelfHost - value of command line argument: self-host

We then need to create an Options class to be used by the CommandLineParser:

1
2
3
4
5
6
7
8
9
10
11
12
13
14
internal sealed class Options
{
[Option(Default = "self-host", HelpText = "The target host - Options [self-host] or [service-fabric-host]")]
public string Host { get; set; }

[Option(Default = "http", HelpText = "The target protocol - Options [http] or [https]")]
public string Protocol { get; set; }

[Option(Default = "localhost", HelpText = "The target IP Address or Uri - Example [localhost] or [127.0.0.1]")]
public string IpAddressOrFQDN { get; set; }

[Option(Default = "5000", HelpText = "The target port - Example [80] or [5000]")]
public string Port { get; set; }
}

We replace the generated OpenAsync code with the following version:

1
2
3
4
5
6
7
8
9
10
Task<string> ICommunicationListener.OpenAsync(CancellationToken cancellationToken)
{
var endpoint = FabricRuntime.GetActivationContext().GetEndpoint(_endpointName);
string serverUrl = $"{endpoint.Protocol}://{FabricRuntime.GetNodeContext().IPAddressOrFQDN}:{endpoint.Port}";

_webHost = WebHostBuilderHelper.GetWebHost(new WebHostBuilder(), endpoint.Protocol.ToString(), endpoint.Port.ToString());
_webHost.Start();

return Task.FromResult(serverUrl);
}

Lastly we create our common GetWebHost method:

1
2
3
4
5
6
7
8
9
10
11
12
13
14
15
public static class WebHostBuilderHelper
{
public static IWebHost GetWebHost(IWebHostBuilder webHostBuilder, string protocol, string port)
{

IWebHost webHost = webHostBuilder
.UseKestrel()
.UseContentRoot(Directory.GetCurrentDirectory())
.UseWebRoot(Path.Combine(Directory.GetCurrentDirectory(), "wwwroot"))
.UseUrls($"{protocol}://+:{port}")
.UseStartup<Startup>()
.Build();

return webHost;
}
}

Note, I prefer to use the following which instructs Kestrel to listen to all IP addresses assigned to the machine on the port specified:

.UseUrls($"{protocol}://+:{port}")

All that is now left to do is within your .Net Core Web Application PackageRoot, edit the ServiceManifest.xml CodePackage so that we tell Web.exe to “host” within Service Fabric in this scenario:

1
2
3
4
5
6
7
8
9
10
<CodePackage Name="C" Version="1.0.0">
<EntryPoint>
<ExeHost>
<Program>Web.exe</Program>
<Arguments>--host service-fabric-host</Arguments>
<WorkingFolder>CodePackage</WorkingFolder>
<ConsoleRedirection FileRetentionCount="5" FileMaxSizeInKb="2048" />
</ExeHost>
</EntryPoint>
</CodePackage>

Your .Net Core Web application will now run both within Service Fabric and in debug mode. To run from the command line, from within your Web application folder issue:

dotnet.exe run

Deploy a Service Fabric Cluster to Azure with .NET Framework 4.6 (ARM template)

For anyone working with Service Fabric and wishing to build a solution targeting the .NET Framework 4.6, deploying to Azure is a challenge given this version of the framework is not yet available in the default Windows Server 2012 image.

To overcome the above limitation and to make the process as easy as possible, we’ll employ a customised Azure Resource Manager (ARM) template which we’ll first generate via the Azure Portal. To get started simply click on the following link https://portal.azure.com/#create/Microsoft.ServiceFabricCluster or in Azure Marketplace search for Service Fabric Cluster.

As there is great guidance and content on Microsoft’s Azure portal, I won’t repeat the steps on Deploying a Service Fabric Cluster using an ARM template however I will ask you to complete all the fields as you normally would (login, password, custom ports for http and https), but instead of pressing create and deploying your cluster we’ll opt to download the ARM template.

Opening the ARM template in Visual Code or your text editor of choice, search for the following json section:

1
2
3
"virtualMachineProfile": {
"extensionProfile": {
"extensions": [

Then add a custom script extension block with the following content:

1
2
3
4
5
6
7
8
9
10
11
12
13
14
15
16
{
"name":"CustomScriptExtensionInstallNet46",
"properties":{
"publisher":"Microsoft.Compute",
"type":"CustomScriptExtension",
"typeHandlerVersion":"1.7",
"autoUpgradeMinorVersion":false,
"settings":{
"fileUris":[
"https://serviceprofiler.azurewebsites.net/content/downloads/InstallNetFx46.ps1"
],
"commandToExecute":"powershell.exe -ExecutionPolicy Unrestricted -File InstallNetFx46.ps1"
},
"forceUpdateTag":"RerunExtension"
}
},

Note, for additional security & flexibility self-host a copy of the InstallNetFx46.ps1 script file.

Download the ARM template, in my case I also rename the file to correspond to the environment targeted (for example AcmeServiceFabricUATCluster.json) and open a PowerShell window to the same folder. Then issue the following commands, substituting the Acme values for your own:

Login-AzureRmAccount

Get-AzureRmSubscription –SubscriptionName "AcmeCorp" | Select-AzureRmSubscription

New-AzureRmResourceGroup -Name AcmeUAT -Location "West US"

New-AzureRmResourceGroupDeployment -Name AcmeUATDeployment -ResourceGroupName AcmeUAT -TemplateFile AcmeServiceFabricUATCluster.json

Enter the values requested such as Password if executing interactively. Upon ARM completion your Service Fabric nodes will now contain an installation of .NET Framework 4.6… How simple! The next step is to deploy your solution…

Asp.Net Core RC2, OpenIdConnect, JWT, Swagger, AutoRest and Angular 2 SPA - Part 2

Continuing on from a previous post this article details my journey in upgrading a Service Fabric multi-tenant application from .Net Core RC1 to RC2, which turned out to be a breaking albeit worthwhile change, specifically for the Startup.cs class and related boot strapping code for Swagger, CookieAuthentication, OpenIdConnectAuthentication and JwtBearerAuthentication. In subsequent posts we’ll explore how .Net Core RC2 hosts web applications but for now let’s look at the first challenge encountered during the upgrade, which was to chase down all required libraries that are also .Net Core RC2 compatible.

As of the time of writing, I could only get Swashbuckle version 6.0.0-beta9 to work with .Net Core RC2.

The below code supports multi-tenant Azure AD authentication and is meant for development scenarios as ValidateIssuer and RequireHttpsMetadata are both set to false for simplicity.

The full dependencies section of your project.json should look something like this:

1
2
3
4
5
6
7
8
9
10
11
12
13
14
15
16
17
18
19
20
21
"dependencies": {
"Microsoft.AspNetCore.Hosting": "1.0.0-rc2-final",
"Microsoft.AspNetCore.Authentication": "1.0.0-rc2-final",
"Microsoft.AspNetCore.Authentication.Cookies": "1.0.0-rc2-final",
"Microsoft.AspNetCore.Authentication.JwtBearer": "1.0.0-rc2-final",
"Microsoft.AspNetCore.Authentication.OpenIdConnect": "1.0.0-rc2-final",
"Microsoft.AspNetCore.Diagnostics": "1.0.0-rc2-final",
"Microsoft.AspNetCore.SpaServices": "1.0.0-beta-000004",
"Microsoft.AspNetCore.StaticFiles": "1.0.0-rc2-final",
"Microsoft.AspNetCore.Mvc.Core": "1.0.0-rc2-final",
"Microsoft.AspNetCore.Mvc.Formatters.Json": "1.0.0-rc2-final",
"Microsoft.AspNetCore.Server.Kestrel": "1.0.0-rc2-final",
"Microsoft.Extensions.Configuration.EnvironmentVariables": "1.0.0-rc2-final",
"Microsoft.Extensions.Configuration.FileExtensions": "1.0.0-rc2-final",
"Microsoft.Extensions.Configuration.Json": "1.0.0-rc2-final",
"Microsoft.IdentityModel.Clients.ActiveDirectory": "3.9.302261508-alpha",
"Microsoft.Extensions.Configuration.Binder": "1.0.0-rc2-final",
"Swashbuckle": "6.0.0-beta9",
"Swashbuckle.SwaggerUi": "6.0.0-beta9",
"Swashbuckle.SwaggerGen": "6.0.0-beta9"
}

Your Startup.cs usings should look something like the below:

1
2
3
4
5
6
7
8
9
10
11
12
13
using Microsoft.AspNetCore.Authentication.Cookies;
using Microsoft.AspNetCore.Authentication.JwtBearer;
using Microsoft.AspNetCore.Authentication.OpenIdConnect;
using Microsoft.AspNetCore.Builder;
using Microsoft.AspNetCore.Hosting;
using Microsoft.AspNetCore.Http;
using Microsoft.Extensions.Configuration;
using Microsoft.Extensions.DependencyInjection;
using Microsoft.Extensions.Logging;
using Microsoft.IdentityModel.Tokens;
using Newtonsoft.Json.Serialization;
using System;
using System.Net;

Having sourced the relevant libraries and compatible versions, it’s now time to turn our attention to the ConfigureServices method wherein we’ll setup Swagger, tweak Json formatting for JavaScript clients such as our Angular 2 SPA, and finally also tweak how AutoRest generates client code. I want AutoRest to generate separate files per server side controller which is achieved through a custom SwaggerOperationNameFilter.

1
2
3
4
5
6
7
8
9
10
11
12
13
14
15
16
17
18
19
20
21
22
23
24
25
26
27
28
29
30
31
32
33
34
35
36
37
public IServiceProvider ConfigureServices(IServiceCollection services)
{

// Add MVC service
services.AddMvc().AddJsonOptions(options =>
{
// Support for JavaScript clients which assume CamelCase - starting with lower case
options.SerializerSettings.ContractResolver = new CamelCasePropertyNamesContractResolver();
});

// Add Swagger API service
services.AddSwaggerGen();
services.ConfigureSwaggerGen(options =>
{
options.SingleApiVersion(new Swashbuckle.SwaggerGen.Generator.Info
{
Version = "v1",
Title = "Acme API",
Description = "Acme API Home",
TermsOfService = "Legal"
});

// Controls how tools like AutoRest generate client code (separate files per server side controller)
options.OperationFilter<SwaggerOperationNameFilter>();
options.DescribeStringEnumsInCamelCase();
options.DescribeAllEnumsAsStrings();
});

var acmeOptions = new AcmeOptions();
Configuration.Bind(acmeOptions);
services.AddSingleton(acmeOptions);

// Configure IoC service
var builder = new ContainerBuilder();
builder.Populate(services);
var container = builder.Build();
return container.Resolve<IServiceProvider>();
}

Code for the custom SwaggerOperationNameFilter:

1
2
3
4
5
6
7
internal class SwaggerOperationNameFilter : IOperationFilter
{
public void Apply(Operation operation, OperationFilterContext context)
{

operation.OperationId = context.ApiDescription.GroupName + "_" + operation.OperationId;
}
}

Concluding the changes required for the .Net Core RC2 upgrade, we dive into the Configure method. Canny readers will notice that UseCookieAuthentication, UseOpenIdConnectAuthentication and UseJwtBearerAuthentication have been refactored to handle options in a more consistent manner with the rest of the .Net Core APIs.

1
2
3
4
5
6
7
8
9
10
11
12
13
14
15
16
17
18
19
20
21
22
23
24
25
26
27
28
29
30
31
32
33
34
35
36
37
38
39
40
41
42
43
44
45
46
47
48
49
50
51
52
53
54
55
56
57
58
59
60
61
62
63
64
65
66
67
68
69
70
71
72
public void Configure(IApplicationBuilder app, IHostingEnvironment env, ILoggerFactory loggerFactory)
{

if (env.IsDevelopment())
{
app.UseDeveloperExceptionPage();
}

app.UseStaticFiles();

app.UseCookieAuthentication(new CookieAuthenticationOptions
{
AuthenticationScheme = CookieAuthenticationDefaults.AuthenticationScheme,
AutomaticAuthenticate = true,
AutomaticChallenge = true,
CookieSecure = CookieSecureOption.Never,
// The default setting for cookie expiration is 14 days. SlidingExpiration is set to true by default
ExpireTimeSpan = TimeSpan.FromHours(1),
SlidingExpiration = true
});

var acmeOptions = app.ApplicationServices.GetService<AcmeOptions>();

app.UseOpenIdConnectAuthentication(new OpenIdConnectOptions
{
AutomaticAuthenticate = true,
AutomaticChallenge = true,
ClientId = acmeOptions.ClientId,
Authority = AcmeConstants.AuthEndpointPrefix + "common/",
PostLogoutRedirectUri = acmeOptions.PostLogoutRedirectUri,
CallbackPath = AcmeRouteConstants.LoginCallbackRoute,
SignInScheme = CookieAuthenticationDefaults.AuthenticationScheme,
AuthenticationScheme = OpenIdConnectDefaults.AuthenticationScheme,
TokenValidationParameters = new TokenValidationParameters { ValidateIssuer = false },
RequireHttpsMetadata = false,
Events = new OpenIdConnectAuthenticationEvents(acmeOptions)
{
OnAuthenticationFailed = context => OpenIdConnectAuthenticationEvents.GetFailedResponse(context)
}
});

// Add JwtBearerAuthentication middleware
app.UseJwtBearerAuthentication(new JwtBearerOptions
{
AuthenticationScheme = JwtBearerDefaults.AuthenticationScheme,
Audience = acmeOptions.JwtAudience,
AutomaticAuthenticate = true,
AutomaticChallenge = true,
Authority = AcmeConstants.AuthEndpointPrefix + "common/",
TokenValidationParameters = new TokenValidationParameters
{
ValidateIssuer = false,
},
RequireHttpsMetadata = false,
Events = new JwtBearerAuthenticationEvents(acmeOptions)
{
OnAuthenticationFailed = context => JwtBearerAuthenticationEvents.GetFailedResponse(context)
}
});

app.UseMvc(routes =>
{
routes.MapRoute(
name: "webapi",
template: "api/{controller}/{action}/{id?}");

routes.MapSpaFallbackRoute("spa-fallback", new { controller = "Home", action = "Index" });
});

// Enable Use of Swagger
app.UseSwaggerGen();
app.UseSwaggerUi();
}

If you’re wondering why I left the Microsoft.IdentityModel.Clients.ActiveDirectory library at “3.9.302261508-alpha”, in upcoming posts we’ll detail a strategy for automated integration testing of your .Net Core APIs using xUnit and optionally a BDD approach (SpecFlow), but more on that topic soon…

Visual Studio Online build step task snippets

Visual Studio Online build definitions & tasks have certainly come a long way since the old xaml template days. There is even a VSO extensions market place. For my current project we are using good old PowerShell based tasks which work together to continuously deploy the solution from VSO to a single node Azure VM Service Fabric cluster which runs all unit, integration and automated UI tests. Some PowerShell snippets which I’ve found helpful along the way are detailed below.

The following task snippet is used to check that a Service Fabric hosted Web endpoint is reachable and ready for integration and UI testing:

1
2
3
4
5
6
7
8
9
10
11
12
13
14
$statuscode = 0
while($statuscode -ne 200)
{
try
{
$statuscode = (Invoke-WebRequest -Uri "http://localhost").statuscode
}
catch
{
Write-Host "$(Get-Date) ....http://localhost is unreachable, sleeping for 30sec"
Start-Sleep -s 30
}
}
Write-Host "$(Get-Date) ....http://localhost is now reachable, continuing"

Logs the content of a test settings xml file and filters out any keys containing the string “Secret”:

1
2
[xml]$testSettings = Get-Content -Path $args[0]
$testSettings.configuration.appSettings.add | Where-Object {$_.key -notmatch "Secret"}

For xUnit tests the provided Visual Studio Test step can be configured with multiple target assemblies separated by a “;” character and wherever possible enable Run In Parallel. Also note to be careful not to end the line with a “;” character as VSO will think there is a missing assembly! For example:

Execution Options >> Test Assembly

$(Build.SourcesDirectory)\test\AcmeCore.Test\bin\$(BuildConfiguration)\AcmeCore.Test.dll;
$(Build.SourcesDirectory)\test\AcmeCommon.Test\bin\$(BuildConfiguration)\AcmeCommon.Test.dll

Advanced Execution Options >> Path to Custom Test Adapters

$(Build.SourcesDirectory)\packages\xunit.runner.visualstudio.2.2.0-beta1-build1144\build\_common\xunit.runner.visualstudio.testadapter.dll

Asp.Net Core RC1, OpenIdConnect, JWT and Angular 2 SPA - Part 1

Working with Asp.Net Core and Angular 2 at the time of writing may feel like a trail blazing experience, especially given the lack of documentation and stability in the underling frameworks, libraries and tools, leading to lost time in debugging and searching for answers.

In the hope of documenting some of my own recent experiences integrating these technologies and Microsoft’s micro-services framework Service Fabric, I’ll dive into specific code areas which have proven fiddley. To start off I should preface that the version of Asp.Net Core I’m currently targeting is RC1 and some bugs and workarounds will not apply to subsequent framework versions. Moreover the Service Fabric version targeted is Service Fabric SDK (version 2.0.217) and Service Fabric Runtime (version 5.0.217).

To begin, we’ll start by configuring CookieAuthentication, OpenIdConnectAuthentication, JwtBearerAuthentication, Mvc & SPA routes in our Asp.Net Core Web project Startup.cs file.

Note that the below code supports multi-tenant Azure AD authentication and is meant for development scenarios as ValidateIssuer and RequireHttpsMetadata are both set to false for simplicity.

1
2
3
4
5
6
7
8
9
10
11
12
13
14
15
16
17
18
19
20
21
22
23
24
25
26
27
28
29
30
31
32
33
34
35
36
37
38
39
40
41
42
43
44
45
46
47
48
49
50
51
52
53
54
55
56
57
58
59
60
61
62
63
64
65
66
67
68
69
public void Configure(IApplicationBuilder app, IHostingEnvironment env, ILoggerFactory loggerFactory)
{

if (env.IsDevelopment())
{
app.UseBrowserLink();
app.UseDeveloperExceptionPage();
}

app.UseIISPlatformHandler();
app.UseStaticFiles();

app.UseCookieAuthentication(options =>
{
options.AuthenticationScheme = CookieAuthenticationDefaults.AuthenticationScheme;
options.AutomaticAuthenticate = true;
options.AutomaticChallenge = true;
options.CookieSecure = CookieSecureOption.Never;
// The default setting for cookie expiration is 14 days. SlidingExpiration is set to true by default
options.ExpireTimeSpan = TimeSpan.FromHours(1);
options.SlidingExpiration = true;
});

var acmeOptions = app.ApplicationServices.GetService<IOptions<AcmeOptions>>().Value;

app.UseOpenIdConnectAuthentication(options =>
{
options.AutomaticAuthenticate = true;
options.AutomaticChallenge = true;
options.ClientId = acmeOptions.AzureAd.ClientId;
options.Authority = AcmeConstants.AuthEndpointPrefix + "common/";
options.PostLogoutRedirectUri = acmeOptions.AzureAd.PostLogoutRedirectUri;
options.CallbackPath = AcmeRouteConstants.LoginCallbackRoute;
options.SignInScheme = CookieAuthenticationDefaults.AuthenticationScheme;
options.AuthenticationScheme = OpenIdConnectDefaults.AuthenticationScheme;
options.TokenValidationParameters = new TokenValidationParameters { ValidateIssuer = false };
options.RequireHttpsMetadata = false;
options.Events = new OpenIdConnectAuthenticationEvents(acmeOptions.AzureAd)
{
OnAuthenticationFailed = context => OpenIdConnectAuthenticationEvents.GetFailedResponse(context)
};
});

app.UseJwtBearerAuthentication(options =>
{
options.AuthenticationScheme = JwtBearerDefaults.AuthenticationScheme;
options.Audience = acmeOptions.AzureAd.JwtAudience;
options.AutomaticAuthenticate = true;
options.AutomaticChallenge = true;
options.Authority = AcmeConstants.Security.AuthEndpointPrefix + "common/";
options.TokenValidationParameters = new TokenValidationParameters
{
ValidateIssuer = false,
};
options.RequireHttpsMetadata = false;
options.Events = new JwtBearerAuthenticationEvents
{
OnAuthenticationFailed = context => JwtBearerAuthenticationEvents.GetFailedResponse(context)
};
});

app.UseMvc(routes =>
{
routes.MapRoute(
name: "webapi",
template: "api/{controller}/{action}/{id?}");

routes.MapSpaFallbackRoute("spa-fallback", new { controller = "Home", action = "Index" });
});
}

Apart from both Jwt and OpenIdConnect support, of interest is the implementation of custom event overrides via the OpenIdConnectAuthenticationEvents and JwtBearerAuthenticationEvents classes. As OnAuthenticationFailed cannot be overridden within the derived event classes we wire up our custom logic as below:

OnAuthenticationFailed = context => OpenIdConnectAuthenticationEvents.GetFailedResponse(context)

OnAuthenticationFailed = context => JwtBearerAuthenticationEvents.GetFailedResponse(context)

In Part 2 we’ll upgrade our code to Asp.Net Core RC2 and add support for Swagger and AutoRest.

SQL Server 2014 Availability Groups, Failover & Identity column behaviour

Many of us have been using SQL Server’s built-in Identity value feature for as long as we can remember but when running SQL Server in HA scenarios such as AlwaysOn Availability Groups, there are a couple of things to take into consideration.

According to MSDN documentation “Consecutive values after server restart or other failures – SQL Server might cache identity values for performance reasons and some of the assigned values can be lost during a database failure or server restart. This can result in gaps in the identity value upon insert. If gaps are not acceptable then the application should use its own mechanism to generate key values. Using a sequence generator with the NOCACHE option can limit the gaps to transactions that are never committed.”

Moreover we read elsewhere “when a table with less than 1000 rows that has an identity value is part of a database that is failed over in an AlwaysOn availability group, the identity is reseeded to 1000. If the identity value is already over 1000, no reseed occurs. This also occurs if you restart the server.”

For existing Applications using Sequence might not be an option. In this case a scarcely documented workaround might be to set a Start-up Parameter on the SQL Server Service: -t272.

The lowercase “t” is an internal trace flag that is used by SQL Server support engineers.

Continuous integration & deployment of Azure Web Roles using TFS on-premise and WebDeploy - Part 1

Much work has gone into making continuous integration & deployment of Azure Websites as simple and low friction as possible with support for Visual Studio Online, Git and BitBucket etc. For customers and teams still using TFS on-premise and working with Web Roles (Azure Cloud Services) the experience is a little more involved with many resorting to rolling their own solutions, TFS Build Templates and PowerShell scripts, if tools like Octopus Deploy and platforms like appveyor are beyond reach.

Before we proceed a small caveat, in part one we’ll look at automating just the deployment of files and code which have changed. This should suffice for most single instance Dev and Test scenarios, where code is compiled and deployed on hourly, daily cycles. For Production you will also want to deploy the .cspkg file in case Azure reprovisions your Web Role instance(s).

I’ll assume you already have knowledge of the TFS build process, in addition to having source and build TFS server environments configured, I’ll skip straight to the MSBuild parameters as this is where most of the magic happens. I’ll also assume you have the latest Azure SDK and Visual Studio files installed on your build server. By VS files I mean the files required by the BuildProcessTemplate, in my case a customised version of the DefaultTemplate.11.xaml.

PowerShell scripts could be used for the Cloud Service provisioning step however for simplicity I’ve opted for a manual step where I use the Microsoft Azure Publish Settings wizard in VS 2013 and do an initial once off deployment of my Web Role to Azure, making sure to enable Remote Desktop for all roles and Enable Web Deploy for all Web Roles. You will need to take note of the username and password created during this process as they are used later as MSBuild arguments.

Once you have successfully Published your Web Role to an Azure Staging Slot, you will need to repeat the process for the Production Slot, so that we can use the Swap Deployment Slots feature (endpoints have to match) once our tests have passed.

To create a new Dev build definition in Team Explorer I select my preferred Source Setting, Build Defaults, Trigger values, Build Template etc. Note in the MSBuild arguments below UserName and Password are values you defined when using the Microsoft Azure Publish Settings wizard in VS 2013. Moreover I am targeting a Debug build, specifying the VisualStudioVersion which for VS 2013 happens to be 12.0. The MsDeployServiceUrl will always be in the form https://xyz.cloudapp.net:8172/MSDeploy.axd where xyz is either your Cloud Service name or the ID Azure generates for your Staging Web Role.

If you are unsure what this value needs to be go to Server Explorer and drill down the Azure Cloud Services until you find your Staging environment. Selecting the Staging node right click Properties: you will see the value for Name is in the form of a GUID. Use this value and replace xyz. To find your DeployIisAppPath value expand the Staging Node, expand the Web Role and select Instance 0, right click Properties: you will see a Name value in the form Contoso.Web_IN_0. Use this value as your DeployIisAppPath.

So putting it all together, your MSBuild arguments should look something like the following:

1
2
3
4
5
6
7
8
9
10
11
/P:VisualStudioVersion=12.0 
/P:Configuration=Debug
/P:DeployOnBuild=True
/P:DeployTarget=MSDeployPublish
/P:MsDeployServiceUrl="https://8f5c8aa194524f18bd2697675025fdab.cloudapp.net:8172/MSDeploy.axd"
/P:DeployIisAppPath="Contoso.Web_IN_0_Web"
/P:AllowUntrustedCertificate=True
/P:MSDeployPublishMethod=WMsvc
/P:CreatePackageOnPublish=True
/P:UserName="contosomasteruser"
/P:Password="YourPasswordGoesHere"

Uploading an Image in MVC 5 to Azure Blob Storage

An interesting customer requirement last week came up where I needed to upload an image in MVC 5 directly to Azure Blob Storage. A simplified version follows, removing some application specific logic and validation steps. To start off I first created a MVC model for image upload purposes.

ImageUploadBindingModel

1
2
3
4
5
6
public class ImageUploadBindingModel
{
[MaxFileSize(1000000, ErrorMessage = "Maximum allowed file size is 1MB")]
[DataType(DataType.Upload)]
public HttpPostedFileBase DisplayImageUpload { get; set; }
}

For additional validation control over the upload, create a custom ValidationAttribute called MaxFileSizeAttribute.

MaxFileSizeAttribute

1
2
3
4
5
6
7
8
9
10
11
12
13
14
15
16
17
18
19
20
21
22
23
24
25
26
27
28
29
30
31
32
33
34
35
36
public class MaxFileSizeAttribute : ValidationAttribute, IClientValidatable
{
private readonly int _maxFileSize;

public MaxFileSizeAttribute(int maxFileSize)
{

_maxFileSize = maxFileSize;
}

public override bool IsValid(object value)
{

var file = value as HttpPostedFileBase;
if (file == null)
{
return false;
}
return file.ContentLength <= _maxFileSize;
}

public override string FormatErrorMessage(string name)
{

return base.FormatErrorMessage(_maxFileSize.ToString());
}

public IEnumerable GetClientValidationRules(ModelMetadata metadata, ControllerContext context)
{

var rule = new ModelClientValidationRule
{
ErrorMessage = FormatErrorMessage(_maxFileSize.ToString()),
ValidationType = "filesize"
};

rule.ValidationParameters["maxsize"] = _maxFileSize;
yield return rule;
}
}

Now let’s turn our attention to the actual Azure logic which streams the upload direct from MVC memory to Azure Blob Storage. Note that CloudConfigurationManager is used to source relevant connection information required by the Azure libraries, something I hope to cover in another post as it’s a very relevant topic for Cloud first .Net solutions.

AzureStorage.cs

1
2
3
4
5
6
7
8
9
10
11
12
13
14
15
16
17
18
19
20
21
22
23
24
25
26
using Microsoft.WindowsAzure;
using Microsoft.WindowsAzure.Storage;
using Microsoft.WindowsAzure.Storage.Auth;
using Microsoft.WindowsAzure.Storage.Blob;

namespace Contoso.Helpers
{
public class AzureStorage
{
public static void UploadFromStream(string uniqueBlobName, string blobContentType, Stream fileStream)
{

// Retrieve storage account from connection string
CloudStorageAccount storageAccount = CloudStorageAccount.Parse(CloudConfigurationManager.GetSetting("StorageConnection"));
// Create the blob client
CloudBlobClient blobClient = storageAccount.CreateCloudBlobClient();
// Retrieve reference to a previously created container
CloudBlobContainer container = blobClient.GetContainerReference(CloudConfigurationManager.GetSetting("StorageContainer"));
// Retrieve reference to a blob
CloudBlockBlob blockBlob = container.GetBlockBlobReference(uniqueBlobName);
// Set Blob ContentType
blockBlob.Properties.ContentType = blobContentType;
// Stream fileStream to Blob - Note: Overwrites any existing file
blockBlob.UploadFromStream(fileStream);
}
}
}

Lastly the Controller handling the upload.

UploadImage

1
2
3
4
5
6
7
8
9
10
11
12
13
14
15
16
17
18
19
20
21
22
23
24
25
26
27
28
29
30
31
32
33
34
35
36
37
38
39
40
41
public async Task UploadImage(ImageUploadBindingModel model)
{

ContosoIdentityUser user = await UserManager.FindByIdAsync(User.Identity.GetUserId());

if (user == null)
{
return null;
}

if (!ModelState.IsValid)
{
return BadRequest(ModelState);
}

var validImageTypes = new string[]
{
"image/gif",
"image/jpeg",
"image/pjpeg",
"image/png"
};

if (model.DisplayImageUpload != null && model.DisplayImageUpload.ContentLength > 0)
{
if (!validImageTypes.Contains(model.DisplayImageUpload.ContentType))
{
ModelState.AddModelError("DisplayImageUpload", "Supported Display Image formats: GIF, JPG or PNG.");
return BadRequest(ModelState);
}
}

if (model.DisplayImageUpload != null && model.DisplayImageUpload.ContentLength > 0)
{
string uniqueBlobName = string.Format("Image_{0}.{1}", user.Id, Path.GetExtension(model.DisplayImageUpload.FileName));
string blobContentType = model.DisplayImageUpload.ContentType;

AzureStorage.UploadFromStream(uniqueBlobName, blobContentType, model.DisplayImageUpload.InputStream);
}

return Ok();
}

Extending Asp.Net Identity 2.0 with custom fields

Recently I needed a quick and low friction way of extending Asp.Net Identity 2.0, tying into the Entity Framework 6 way of working with custom fields and table mappings. To accomplish this first create something similar to a new ContosoIdentityUser which inherits from IdentityUser.

ContosoIdentityUser.cs

1
2
3
4
5
6
7
8
9
10
11
12
13
14
15
16
using Microsoft.AspNet.Identity.EntityFramework;

namespace Contoso.Web
{
public class ContosoIdentityUser : IdentityUser
{
public string FirstName { get; set; }
public string LastName { get; set; }
public DateTime DOB { get; set; }
public string AddressLine1 { get; set; }
public string AddressLine2 { get; set; }
public string Suburb { get; set; }
public string State { get; set; }
public string Postcode { get; set; }
}
}

We then likewise create a new ContosoIdentityDbContext which inherits from IdentityDbContext.

ContosoIdentityDbContext.cs

1
2
3
4
5
6
7
8
9
10
11
12
13
14
15
16
17
18
19
20
21
22
23
24
25
26
27
28
29
30
31
32
33
34
35
36
37
38
39
40
41
using System;
using System.Collections.Generic;
using System.Data.Entity;
using System.Linq;
using System.Web;

using Microsoft.AspNet.Identity.EntityFramework;

namespace Contoso.Web
{
public class ContosoIdentityDbContext : IdentityDbContext
{
public ContosoIdentityDbContext()
: base("DefaultConnection")
{

}

protected override void OnModelCreating(DbModelBuilder modelBuilder)
{

if (modelBuilder == null)
{
throw new ArgumentNullException("modelBuilder");
}

SetIdentityUserModel(modelBuilder);
base.OnModelCreating(modelBuilder);
}

private void SetIdentityUserModel(DbModelBuilder modelBuilder)
{

modelBuilder.Entity().Property(x => x.FirstName).HasMaxLength(50).IsRequired();
modelBuilder.Entity().Property(x => x.LastName).HasMaxLength(50).IsRequired();
modelBuilder.Entity().Property(x => x.DOB).IsRequired();
modelBuilder.Entity().Property(x => x.AddressLine1).HasMaxLength(100).IsRequired();
modelBuilder.Entity().Property(x => x.AddressLine2).HasMaxLength(100).IsOptional();
modelBuilder.Entity().Property(x => x.Suburb).HasMaxLength(50).IsRequired();
modelBuilder.Entity().Property(x => x.State).HasMaxLength(3).IsRequired();
modelBuilder.Entity().Property(x => x.Postcode).HasMaxLength(4).IsRequired();
}
}
}

Now to stitch it all together in your boot strapper logic, in my case this is within Startup(), just wire up to our newly created extensions:

1
2
var userManager = new UserManager(new UserStore(new ContosoIdentityDbContext()));
UserManagerFactory = () => userManager;